

# How to Implement Passkeys on Your Website: A WebAuthn Guide for Developers
TL;DR: Implementing passkeys means adding two WebAuthn "ceremonies" to your app — registration (the browser creates a public/private key pair via an authenticator and sends the public key to your server) and authentication (the authenticator signs a server-issued challenge, and your server verifies that signature against the stored public key). In Node.js, SimpleWebAuthn handles the cryptographic heavy lifting on both the server and the browser.
If you landed here searching for how to implement passkeys on my website, you're really asking two things: how the registration/login flow works under the hood, and what code actually wires it up. This guide covers both, using the current WebAuthn spec and the current SimpleWebAuthn API (v14, as of late 2026).
What Is a Passkey, Actually?
A passkey is a FIDO2/WebAuthn credential: an asymmetric key pair generated by an authenticator (a phone, laptop, or hardware security key) and scoped to your site's origin. The private key stays with the authenticator — on a hardware key it never leaves the device, and a synced passkey is copied only through the platform's end-to-end-encrypted keychain (iCloud Keychain, Google Password Manager) — and it is never sent to your server, so your server can't leak it. Your server only ever stores the public key, plus some metadata needed to verify future logins.
Using the private key requires the user to pass a check on the authenticator itself — Face ID, a fingerprint, or a device PIN — which is why WebAuthn calls this step "user verification" rather than authentication on its own. The signature it produces is what proves possession of the private key.
The Two WebAuthn Ceremonies: Registration and Login
WebAuthn defines these flows as "ceremonies" because they involve the user, the browser, an authenticator, and your server acting in a fixed sequence — not just an API call. A few terms matter for implementing this correctly:
- Challenge — a random value your server generates for every registration or login attempt. The authenticator signs it, which is what prevents replay attacks. A challenge must never be reused.
- Relying Party ID (RP ID) — your site's domain (e.g.
example.com), without scheme or port. Credentials are bound to this domain; a passkey created forexample.comwon't work onother-example.com. - Public key, stored server-side — after registration, you store the credential ID and public key against the user's account. Nothing secret is stored.
- Signature counter — a value the authenticator increments on each use. If a login presents a counter lower than or equal to what you have stored, that's a signal the credential may have been cloned, but the WebAuthn spec allows authenticators that don't implement a counter to always report 0 (many synced passkey providers do), so treat a zero counter as "not supported" rather than as a clone signal (W3C WebAuthn Level 3, signature counter).
- Discoverable credentials (formerly "resident keys") — passkeys that the authenticator itself remembers, so the user can log in by picking an account from a browser-rendered list instead of typing a username first.
- Conditional UI / autofill — the browser feature that shows those discoverable passkeys directly in a username
<input>'s autofill dropdown.
Registration and login are separate ceremonies with separate WebAuthn calls; the sections below implement each one.
How to Implement Passkeys on Your Website (Step by Step)
This walkthrough uses `@simplewebauthn/server` (Node.js) and `@simplewebauthn/browser`, both currently at major version 14. SimpleWebAuthn wraps the raw WebAuthn ceremonies and validates the CBOR/COSE structures the spec requires, so you're not parsing attestation objects by hand.
Step 1: Set Up WebAuthn in Node.js with SimpleWebAuthn
npm install @simplewebauthn/server @simplewebauthn/browserDefine your Relying Party constants once and reuse them everywhere — a mismatch between the RP ID you used at registration and the one used at login will fail verification:
const rpName = 'Your App Name';
const rpID = 'example.com'; // no scheme, no port
const origin = `https://${rpID}`;
Step 2: Generate Registration Options
When a logged-in user opts into a passkey (or a new user signs up), ask the server for a challenge and options:
import { generateRegistrationOptions } from '@simplewebauthn/server';

app.post('/webauthn/register-options', async (req, res) => {
  const user = req.user; // already authenticated by session or password
  const userPasskeys = await getPasskeysForUser(user.id);

  const options = await generateRegistrationOptions({
    rpName,
    rpID,
    userName: user.username,
    attestationType: 'none',
    excludeCredentials: userPasskeys.map((passkey) => ({
      id: passkey.id,
      transports: passkey.transports,
    })),
    authenticatorSelection: {
      residentKey: 'preferred',
      userVerification: 'preferred',
      authenticatorAttachment: 'platform',
    },
  });

  await saveCurrentChallenge(user.id, options.challenge);
  res.json(options);
});
residentKey: 'preferred' requests a discoverable credential so username-less login works later. attestationType: 'none' is the recommended default for most consumer sites — you're verifying the credential is genuine WebAuthn, not auditing which vendor manufactured the authenticator.
Step 3: Trigger `navigator.credentials.create()` in the Browser
SimpleWebAuthn's browser package wraps the native navigator.credentials.create() call and normalizes its output to JSON:
import { startRegistration } from '@simplewebauthn/browser';

const options = await fetch('/webauthn/register-options', { method: 'POST' }).then((r) => r.json());
const attestationResponse = await startRegistration({ optionsJSON: options });

await fetch('/webauthn/register-verify', {
  method: 'POST',
  headers: { 'Content-Type': 'application/json' },
  body: JSON.stringify(attestationResponse),
});
This is the point where the browser hands off to the platform authenticator — Touch ID, Windows Hello, or a security key — which generates the key pair and asks for a biometric or PIN.
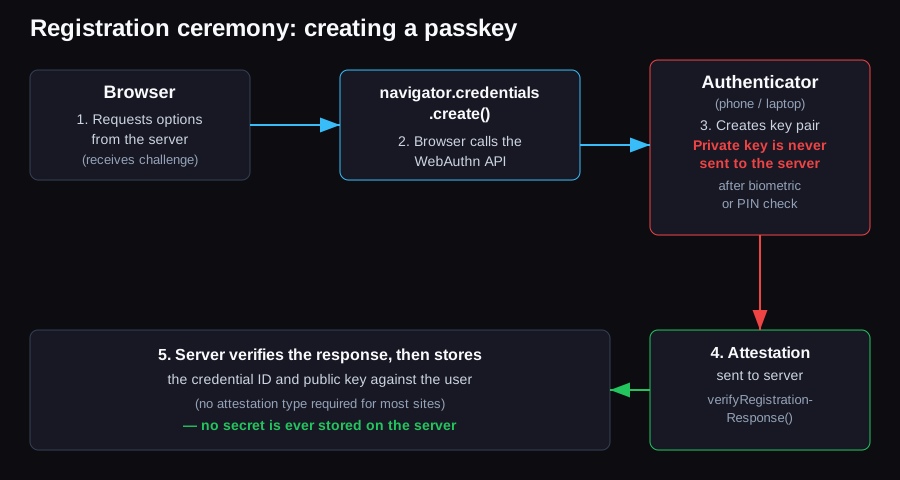
The registration ceremony: the private key is generated and stays on the authenticator; only the public key and credential ID reach the server.
Step 4: Verify Registration and Store the Credential
import { verifyRegistrationResponse } from '@simplewebauthn/server';

app.post('/webauthn/register-verify', async (req, res) => {
  const user = req.user;
  const expectedChallenge = await getCurrentChallenge(user.id);

  const verification = await verifyRegistrationResponse({
    response: req.body,
    expectedChallenge,
    expectedOrigin: origin,
    expectedRPID: rpID,
  });

  if (!verification.verified || !verification.registrationInfo) {
    return res.status(400).json({ error: 'Registration verification failed' });
  }

  const { credential, credentialDeviceType, credentialBackedUp } = verification.registrationInfo;

  await savePasskey(user.id, {
    id: credential.id,
    publicKey: credential.publicKey,
    counter: credential.counter,
    transports: credential.transports,
    deviceType: credentialDeviceType,
    backedUp: credentialBackedUp,
  });

  res.json({ verified: true });
});
Only credential.id (a public identifier) and credential.publicKey (raw public key bytes) are stored — there is no secret in this table.
Step 5: Generate Authentication Options
import { generateAuthenticationOptions } from '@simplewebauthn/server';

app.post('/webauthn/login-options', async (req, res) => {
  const { username } = req.body; // omit entirely for username-less login
  const userPasskeys = username ? await getPasskeysForUser(username) : [];

  const options = await generateAuthenticationOptions({
    rpID,
    allowCredentials: userPasskeys.length
      ? userPasskeys.map((passkey) => ({ id: passkey.id, transports: passkey.transports }))
      : undefined,
    userVerification: 'preferred',
  });

  await saveCurrentChallenge(username ?? 'anonymous', options.challenge);
  res.json(options);
});
Omitting allowCredentials is what enables discoverable, username-less login — the browser and authenticator figure out which credential applies.
Step 6: Trigger `navigator.credentials.get()` and Add Autofill
import { startAuthentication } from '@simplewebauthn/browser';

const options = await fetch('/webauthn/login-options', { method: 'POST' }).then((r) => r.json());
const assertionResponse = await startAuthentication({ optionsJSON: options });

await fetch('/webauthn/login-verify', {
  method: 'POST',
  headers: { 'Content-Type': 'application/json' },
  body: JSON.stringify(assertionResponse),
});
For conditional UI (the browser-native autofill dropdown of saved passkeys), add autocomplete="webauthn" to your username field and pass useBrowserAutofill: true:
<input type="text" name="username" autocomplete="username webauthn" />const assertionResponse = await startAuthentication({ optionsJSON: options, useBrowserAutofill: true });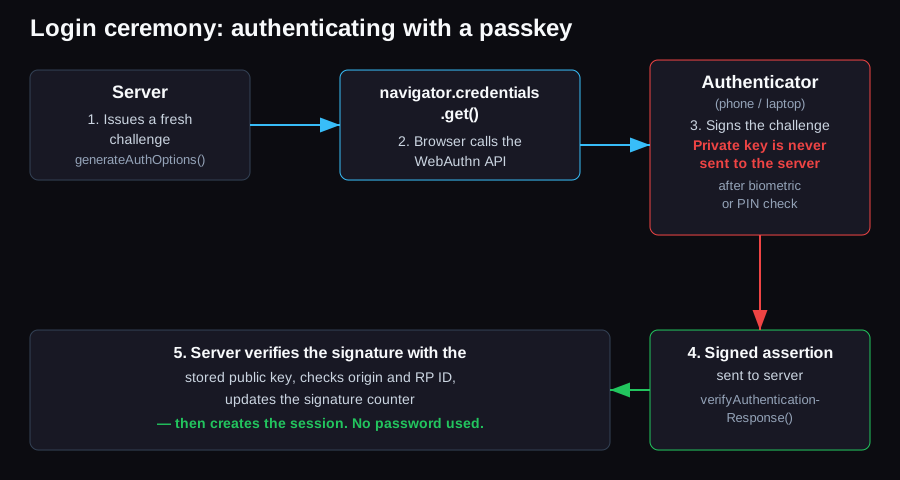
The login ceremony: the authenticator signs the server's challenge with the private key, which is never sent to the server; the server verifies that signature with the stored public key.
Step 7: Verify the Authentication Response
import { verifyAuthenticationResponse } from '@simplewebauthn/server';

app.post('/webauthn/login-verify', async (req, res) => {
  const expectedChallenge = await getCurrentChallenge(req.body.response?.userHandle ?? 'anonymous');
  const passkey = await getPasskeyByCredentialId(req.body.id);

  const verification = await verifyAuthenticationResponse({
    response: req.body,
    expectedChallenge,
    expectedOrigin: origin,
    expectedRPID: rpID,
    credential: {
      id: passkey.id,
      publicKey: passkey.publicKey,
      counter: passkey.counter,
      transports: passkey.transports,
    },
  });

  if (!verification.verified) {
    return res.status(401).json({ error: 'Authentication failed' });
  }

  const { newCounter } = verification.authenticationInfo;
  await updatePasskeyCounter(passkey.id, newCounter);

  // create your normal session here
  res.json({ verified: true });
});
Updating the stored counter after every successful login is what makes the clone-detection check in the next login attempt meaningful.
Migrating from Passwords: Roll Out Passkeys Alongside Existing Logins
Don't force a password rip-and-replace. The practical migration path is additive:
1. Let existing users add a passkey from account settings, using the registration flow above, while the password stays valid.
2. Offer passkey registration as a prompt right after a successful password login, when the user is already verified.
3. Surface passkey login as the primary option on the login page (with useBrowserAutofill), but keep password + any existing MFA as a fallback.
4. Only consider removing passwords for an account once it has at least one passkey and, ideally, a second recovery method.
Offering passkeys alongside existing sign-in, rather than forcing them, means users who lose a device or use an unsupported browser are never locked out. If you want this reviewed as part of a broader authentication hardening effort, that's the kind of thing covered under cybersecurity services.
Account Recovery Without a Password
The hard problem with passkeys isn't the happy path — it's what happens when a user loses their only device. A few patterns to combine:
- Multiple passkeys per account. Let users register a passkey on more than one device (phone and laptop), so losing one doesn't lock them out.
- Platform sync. Passkeys synced through a platform account (iCloud Keychain, Google Password Manager) survive a single lost device, since the private key material is backed up by the platform, not tied to that one piece of hardware.
- A fallback credential. Keep email-based magic links or a password as a recovery path, gated by additional verification (email ownership, support review) rather than leaving it as an equally-weighted login option.
- Don't silently downgrade security. Whatever recovery path you keep is now your weakest link — treat it with the same scrutiny as the passkey flow itself.
Passkeys vs Passwords: What Actually Changes?
| Password | Passkey | |
|---|---|---|
| Secret stored on server | Yes (a hash) | No — only a public key |
| Phishable | Yes | No — bound to origin/RP ID |
| Vulnerable to credential stuffing | Yes | No — no shared secret to reuse |
| User effort | Type/recall a secret | Biometric or device PIN |
| Cross-device by default | Yes (user remembers it) | Only if synced by the platform |
The core shift: passwords are a shared secret an attacker can steal from your database or trick a user into typing on a fake site. A passkey's private key is never transmitted or stored anywhere but the device, and the signature it produces is bound to your RP ID, so a phishing site simply can't complete the ceremony.
Passkeys vs MFA: Is a Passkey a Second Factor?
A passkey is not "a second factor" bolted onto a password — it's a single credential that already combines two of the traditional authentication factors: something you have (the device holding the private key) and something you are/know (the biometric or PIN that unlocks it). NIST's current digital identity guidance treats a passkey that requires user verification as a multi-factor cryptographic authenticator, so on its own it can meet Authenticator Assurance Level 2. Synced passkeys can't be used at AAL3, because their private keys are exportable (NIST SP 800-63B-4, Authenticators). If you have to meet a specific framework such as PCI DSS, a sector regulator or a customer contract, check its own wording rather than assuming a passkey satisfies its MFA requirement.
Where MFA is TOTP codes or SMS added after a password, that combination is still phishable at the password step and interceptable at the code step. A passkey removes both weaknesses by replacing the password entirely rather than adding a factor next to it.
FAQ
Are passkeys the same as 2FA?
No. Passkeys vs 2FA is a common point of confusion: 2FA is usually a password plus a second step (SMS code, authenticator app). A passkey replaces the password itself with a single phishing-resistant credential that already combines possession and verification, so it isn't "one factor" in the way a lone password is.
What is SimpleWebAuthn?
SimpleWebAuthn is an open-source TypeScript library pair — @simplewebauthn/server and @simplewebauthn/browser — that implements the WebAuthn spec's option generation and response verification, so you don't hand-roll CBOR/COSE parsing or challenge handling yourself.
Do I need to remove passwords to add passkeys?
No. The recommended path is running both side by side: let users register a passkey while keeping their password active, and only retire the password later if the account has a reliable passkey and recovery setup.
What happens if a user loses their device?
They need another way in: a second registered passkey on another device, a platform-synced passkey (iCloud Keychain, Google Password Manager), or a gated fallback credential like a verified-email reset flow, so build at least one of these before removing passwords entirely.
Sources
- Web Authentication: An API for accessing Public Key Credentials – Level 3 (W3C Recommendation)
- WebAuthn Level 3 Is Now a W3C Recommendation — FIDO Alliance
- passkeys.dev — terminology reference
- SimpleWebAuthn — @simplewebauthn/server docs
- SimpleWebAuthn — @simplewebauthn/browser docs
- @simplewebauthn/server on npm
- FIDO Alliance: Five Billion Passkeys — World Passkey Day 2026 report